Hide Cookie Banners Before Visual Checks
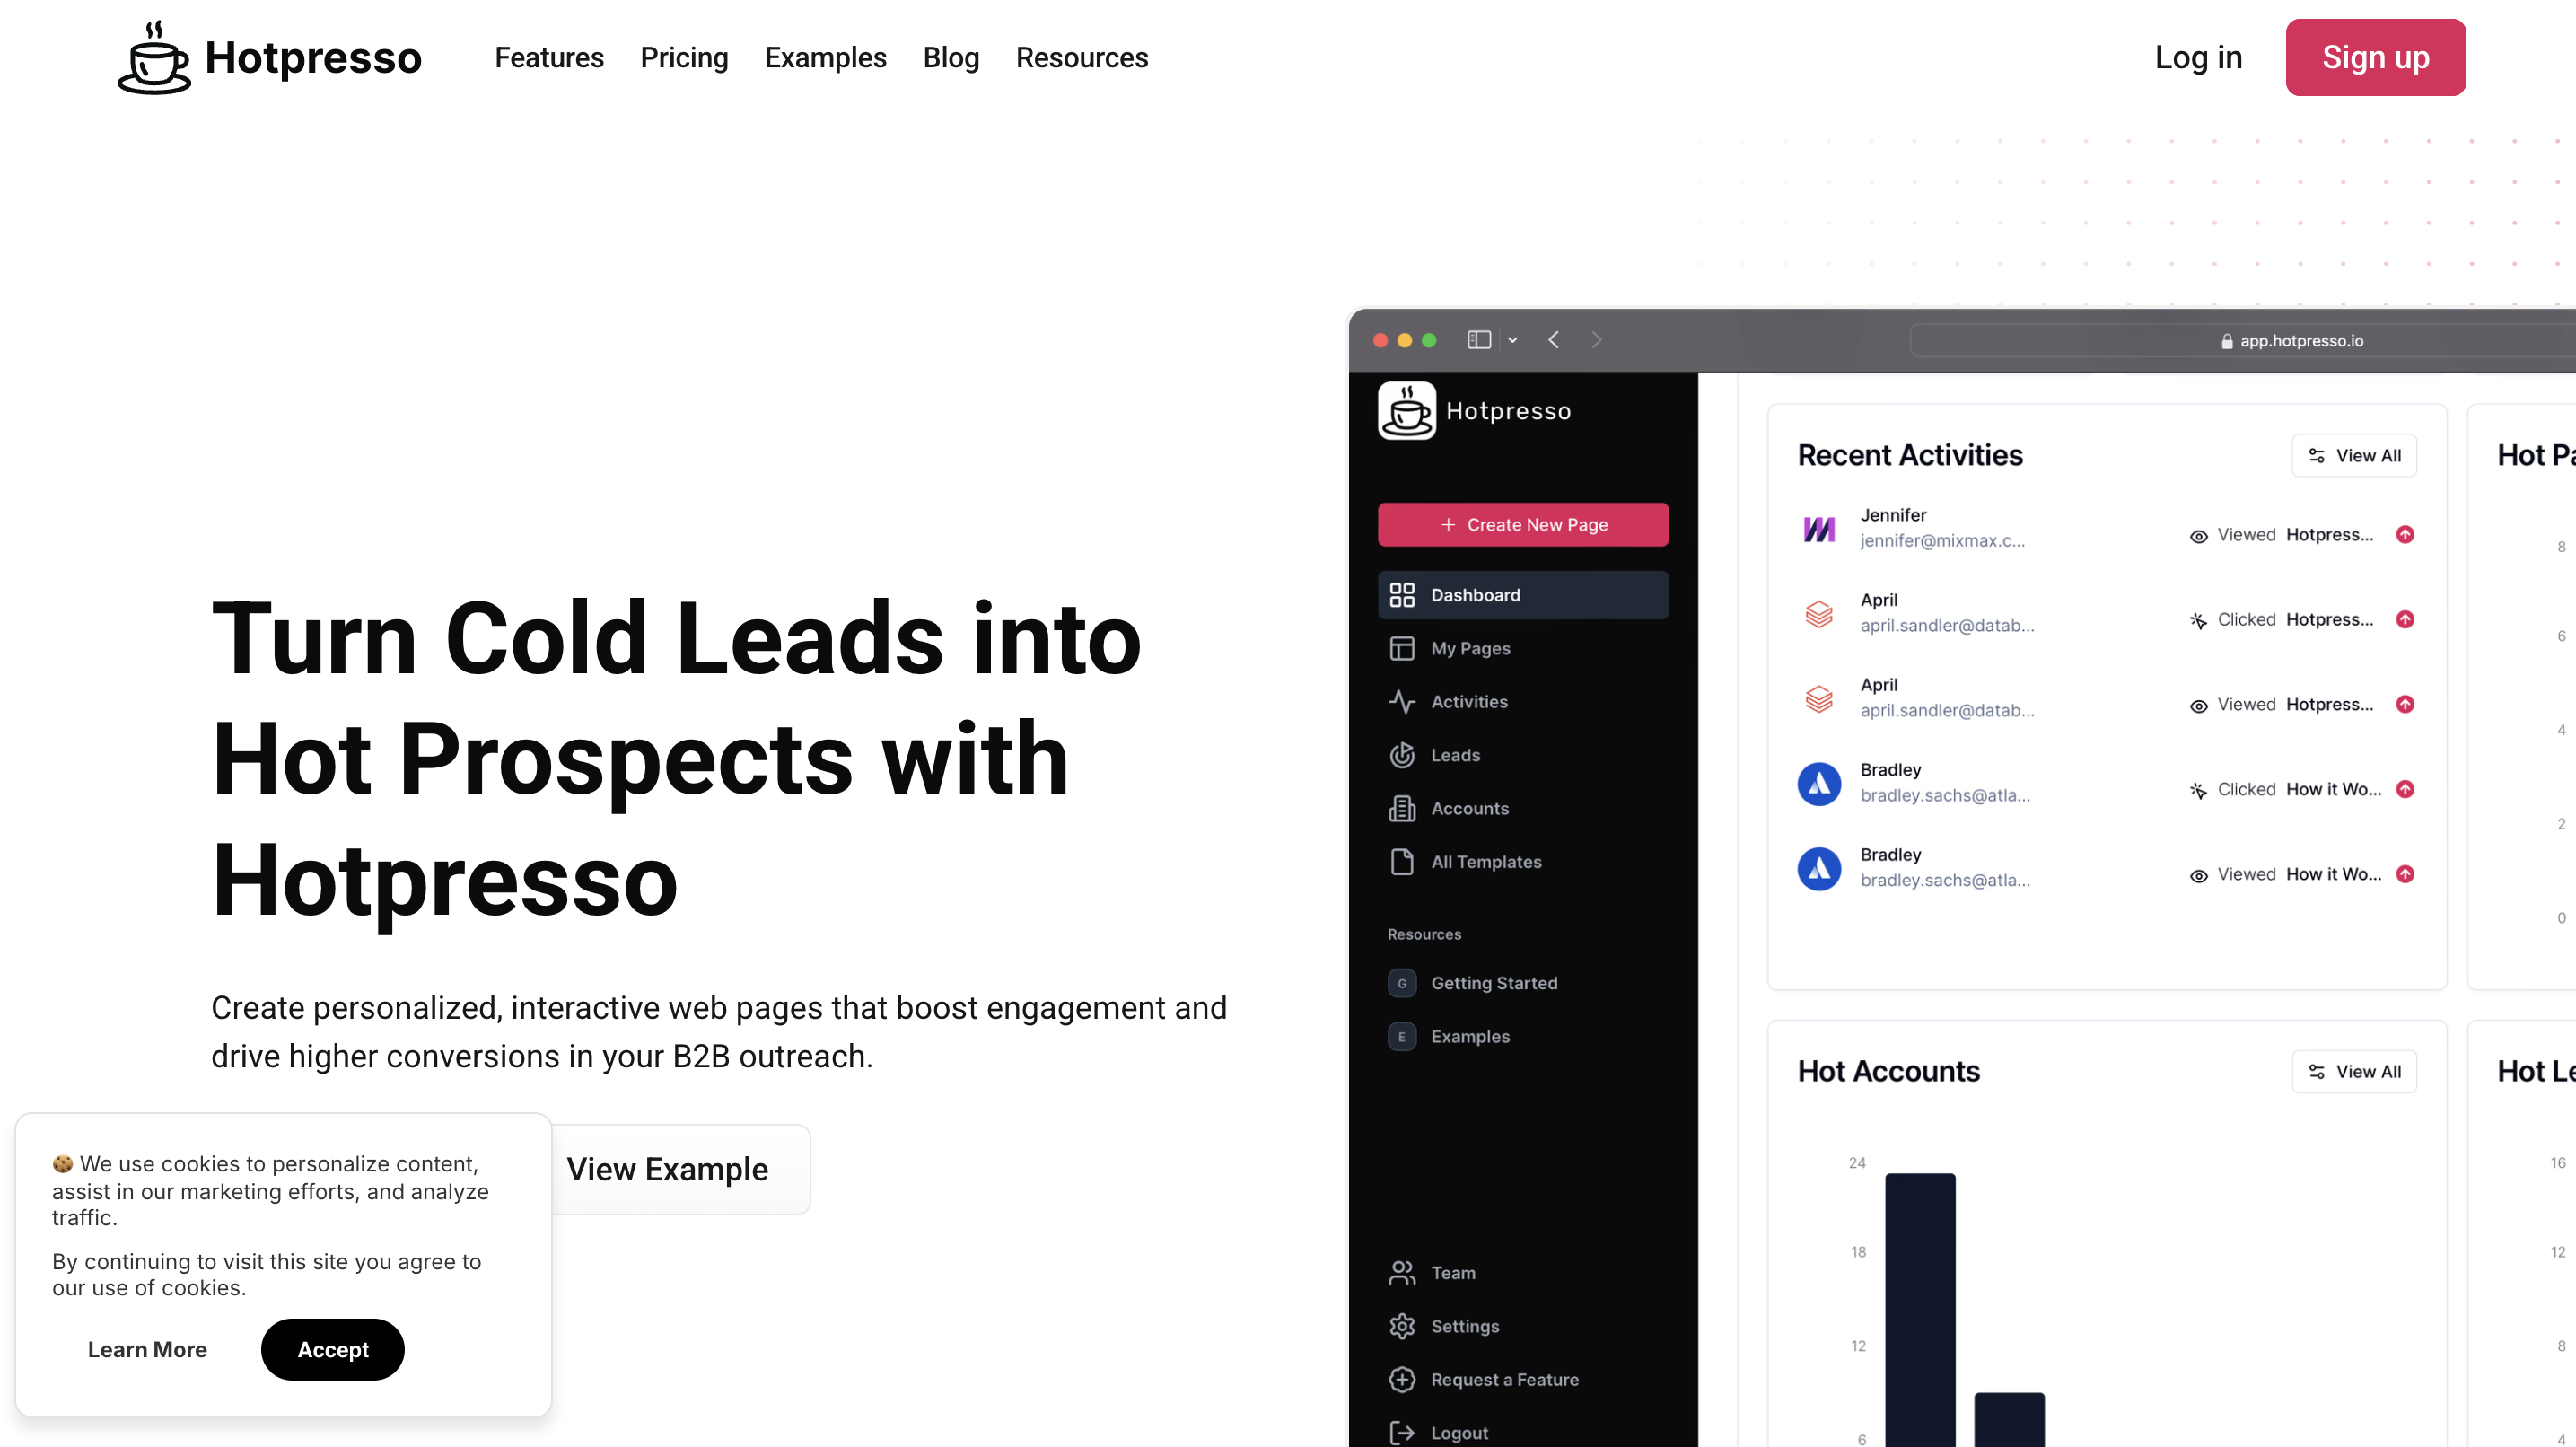
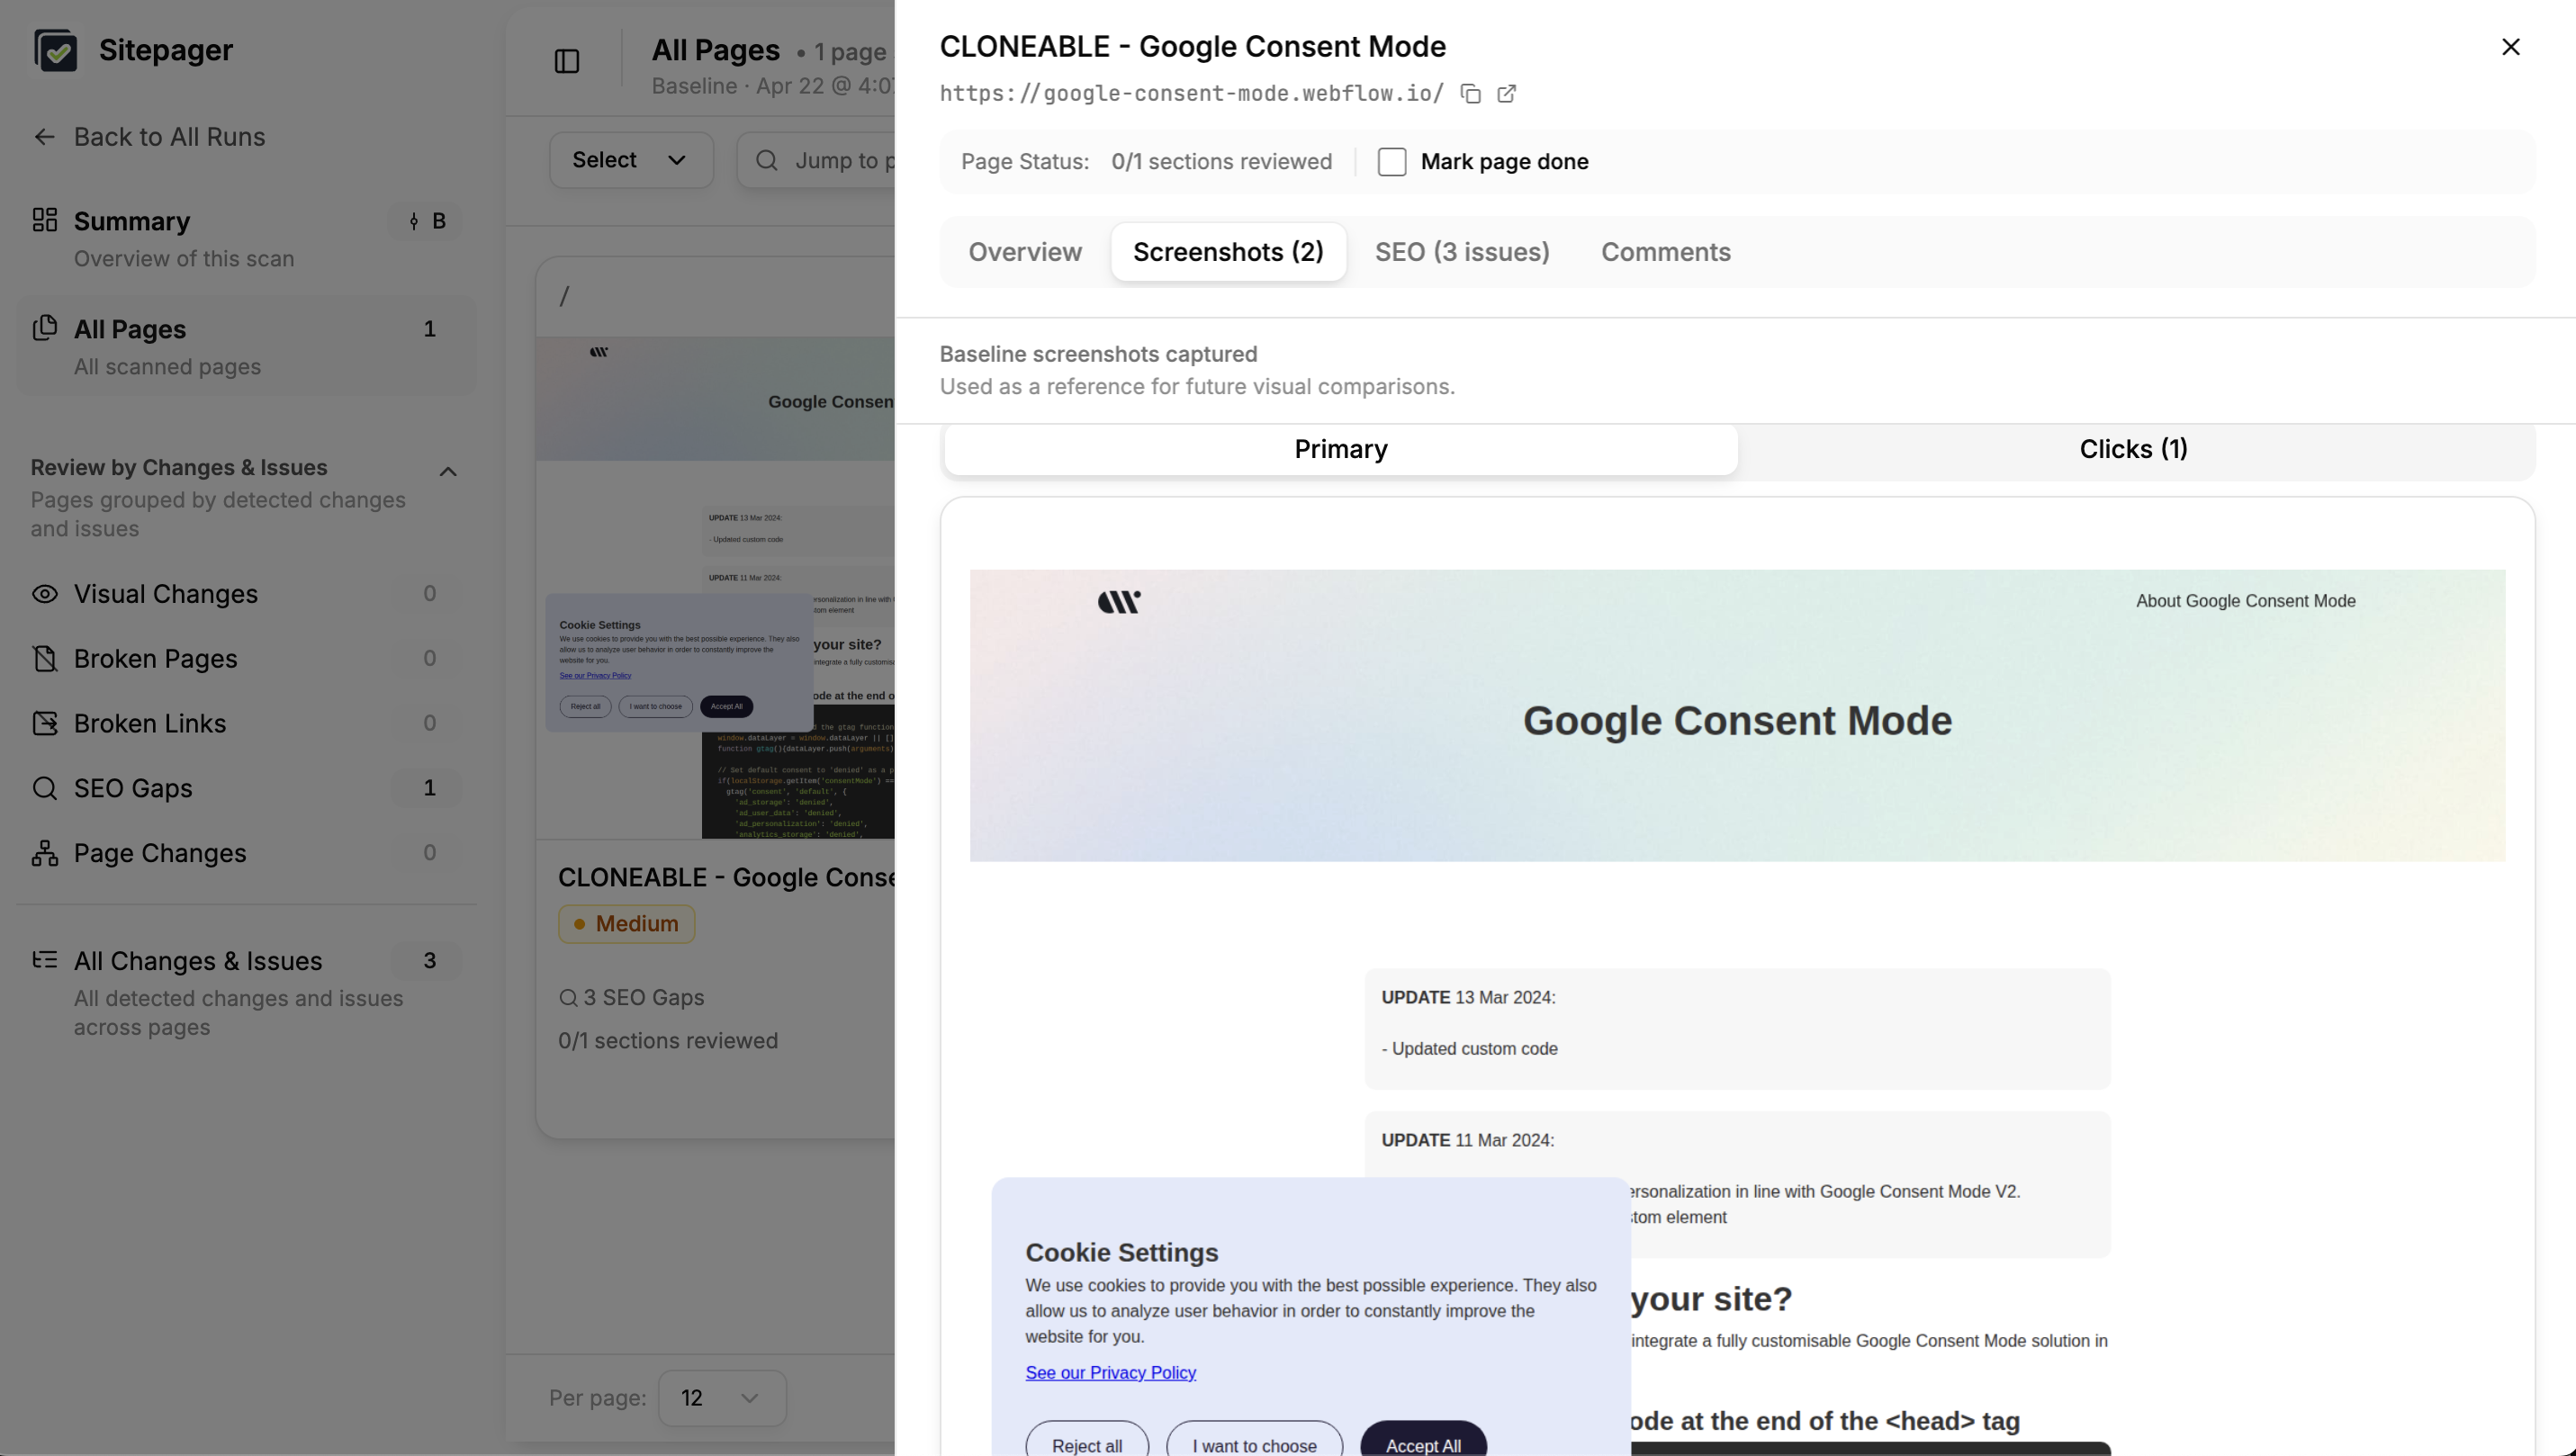
Most marketing sites show a cookie consent popup to first-time visitors. During visual checks, that popup appears on top of every screenshot, covering navigation, hero content, or whatever sits underneath it.
Before running a scan, hide the popup so your screenshots show the page clearly.
Quick answer:
- Cookie banners block the UI in every screenshot and need to be hidden before Sitepager captures the page
- Hide the banner using a CSS selector, a short text string that identifies the banner element on the page
- Add the selector to Dynamic Content Selectors in your scan settings, then re-run
- If you do not know your selector, the How to find your cookie banner CSS selector section walks through it step by step in your browser
How to hide a cookie banner in Sitepager
Section titled “How to hide a cookie banner in Sitepager”Step 1: Add the selector to your scan
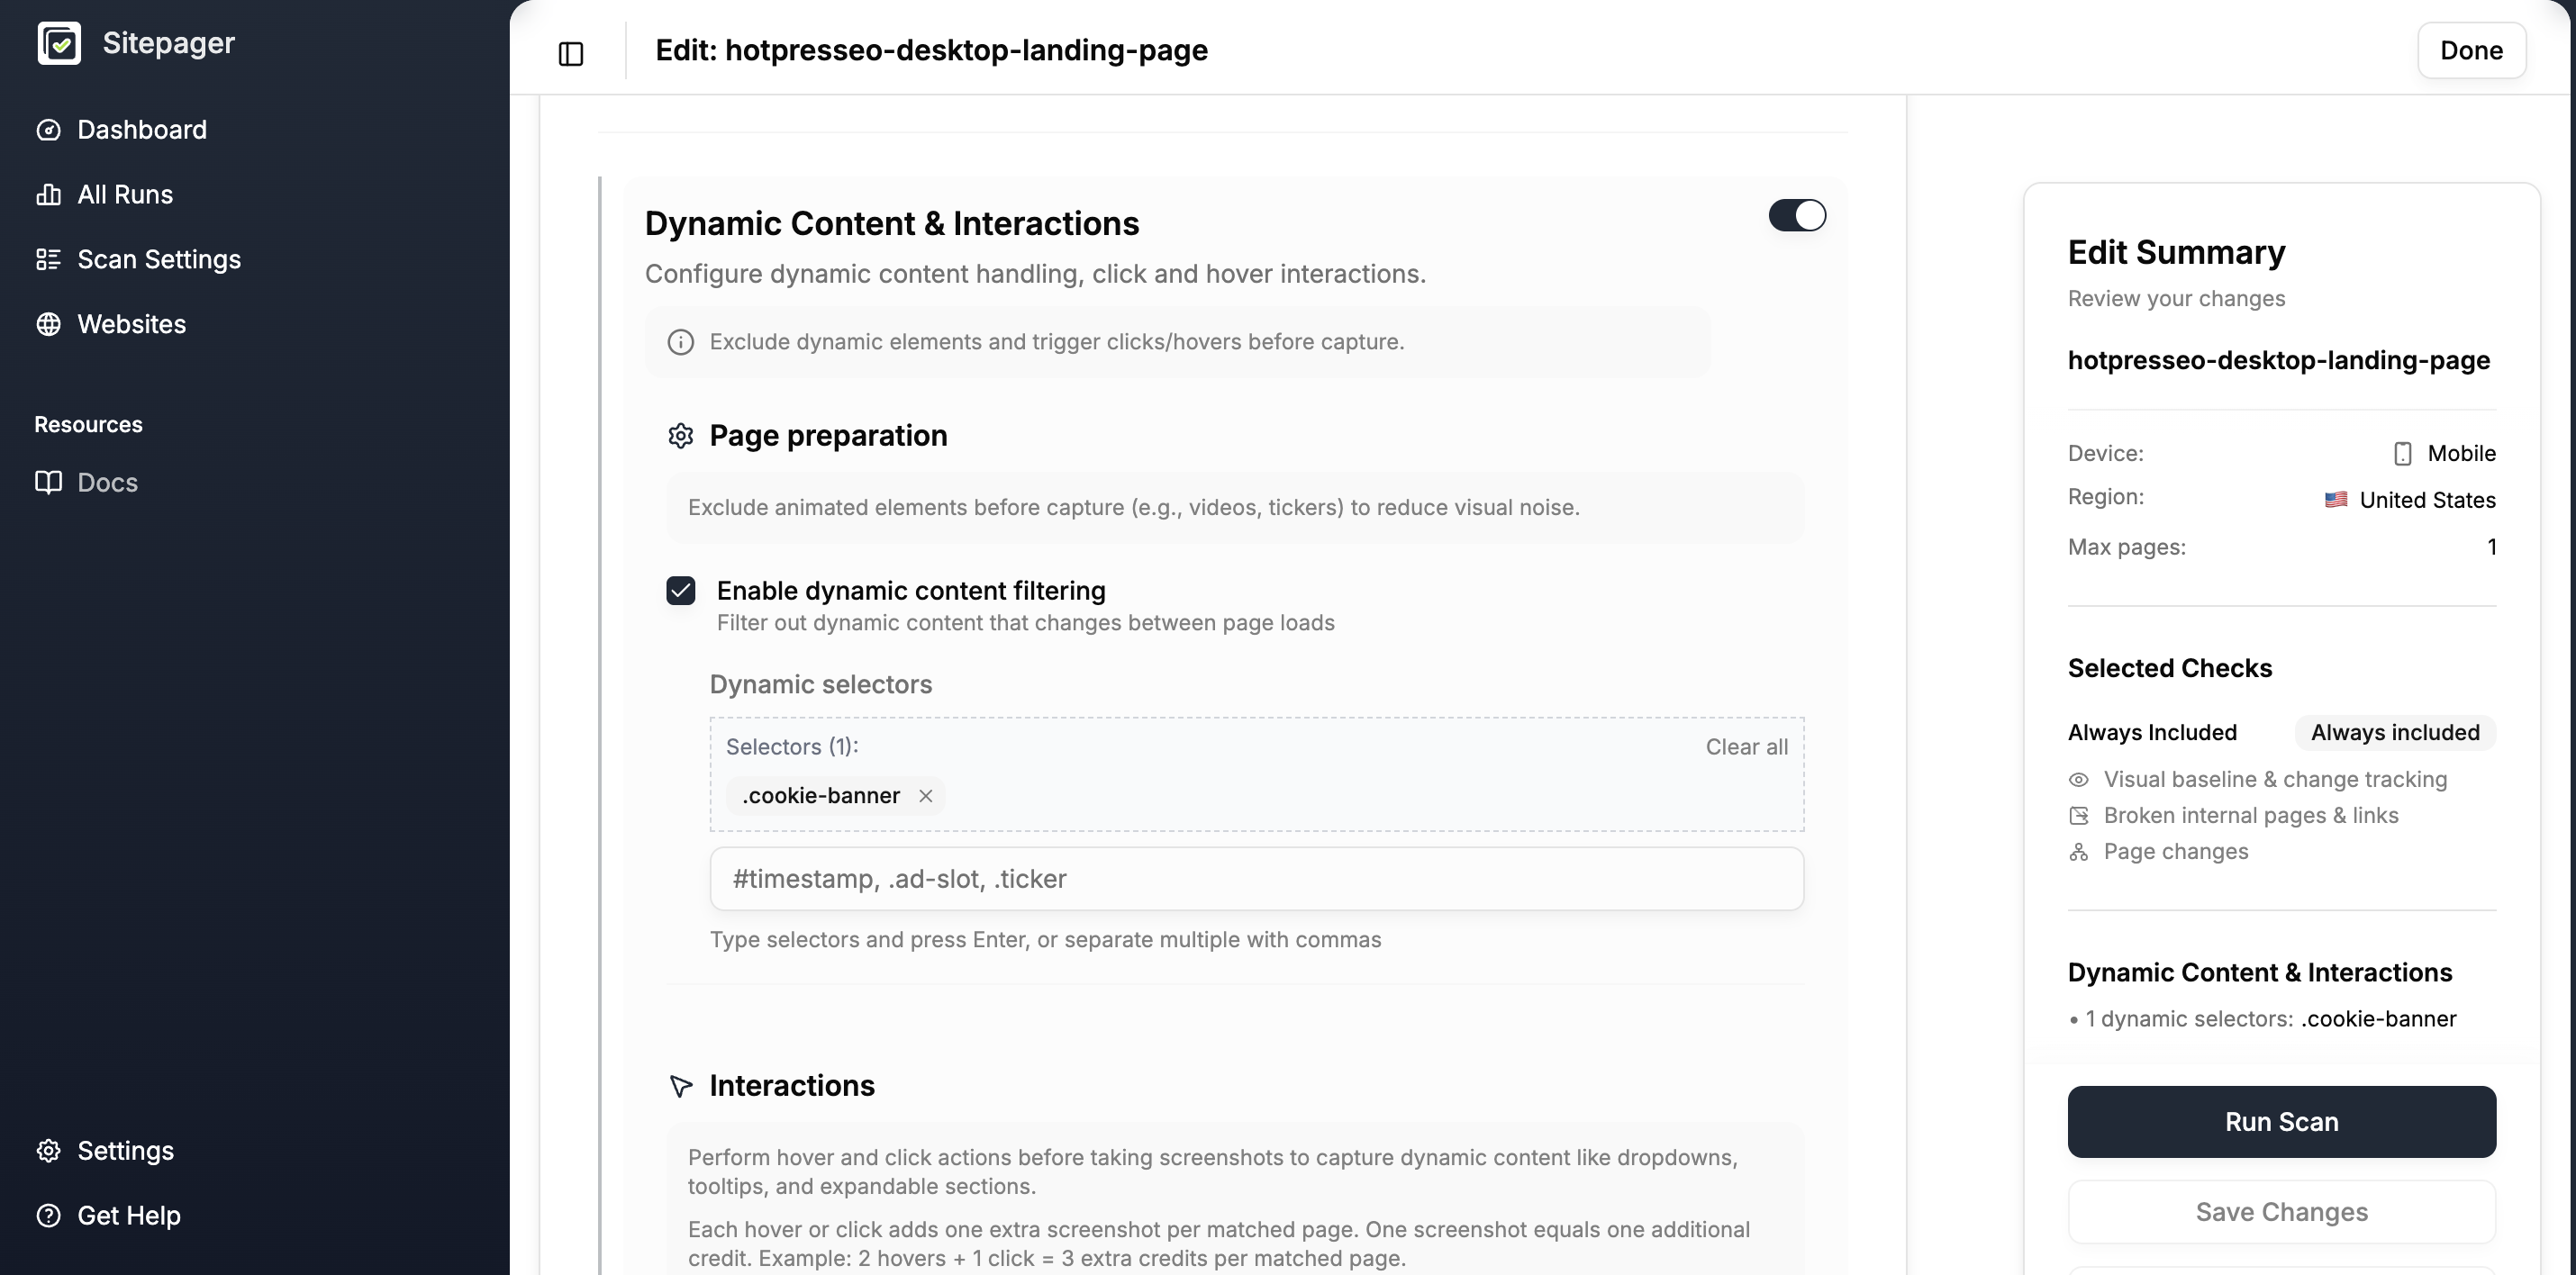
Section titled “Step 1: Add the selector to your scan”In Sitepager, open your scan and click Scan Settings. Go to Advanced Settings > Dynamic Content & Interactions and turn on the section toggle in the top right corner.
Under Page preparation, check Enable dynamic content filtering. A text field called Dynamic selectors appears.
Paste your cookie banner’s CSS selector into that field. A CSS selector is a short text string that identifies a specific element on a page. It starts with # for an ID or . for a class. Make sure to include that symbol at the start.
Examples from common cookie tools:
- OneTrust:
#onetrust-banner-sdk - Cookiebot:
#CybotCookiebotDialog - Finsweet Cookie Consent (Webflow):
.fs-cc-banner_component - Framer sites: the selector depends on what you named the banner layer, so inspect to confirm
- Custom banners:
.cookie-banner,#cookie-notice, or whatever your site uses
If you do not know your selector yet, see How to find your cookie banner CSS selector below.
Step 2: Run the scan and confirm
Section titled “Step 2: Run the scan and confirm”Before running across your full site, set the max pages to 1 in your scan settings and run a single page first. Open the result and confirm the banner is gone from the screenshot. Once confirmed, remove the limit and run the full scan.
If the banner is still in the screenshot, the selector did not match. See Troubleshooting below.
How to find your cookie banner CSS selector
Section titled “How to find your cookie banner CSS selector”If you do not know the CSS selector for your cookie banner, follow these steps to find it in your browser. You only need to do this once.
A CSS selector is a short text string, like #onetrust-banner-sdk or .cookie-banner, that points to a specific element on a webpage. Sitepager uses it to find and remove the banner before taking a screenshot.
Instructions are written for Chrome. Safari and Firefox have the same tools with slightly different labels.
Step 1: Open your site in incognito
Section titled “Step 1: Open your site in incognito”Open a new incognito window (Cmd+Shift+N on Mac, Ctrl+Shift+N on Windows) and paste your site URL. Incognito windows do not carry over existing cookies, so the banner will appear as it does for a first-time visitor.
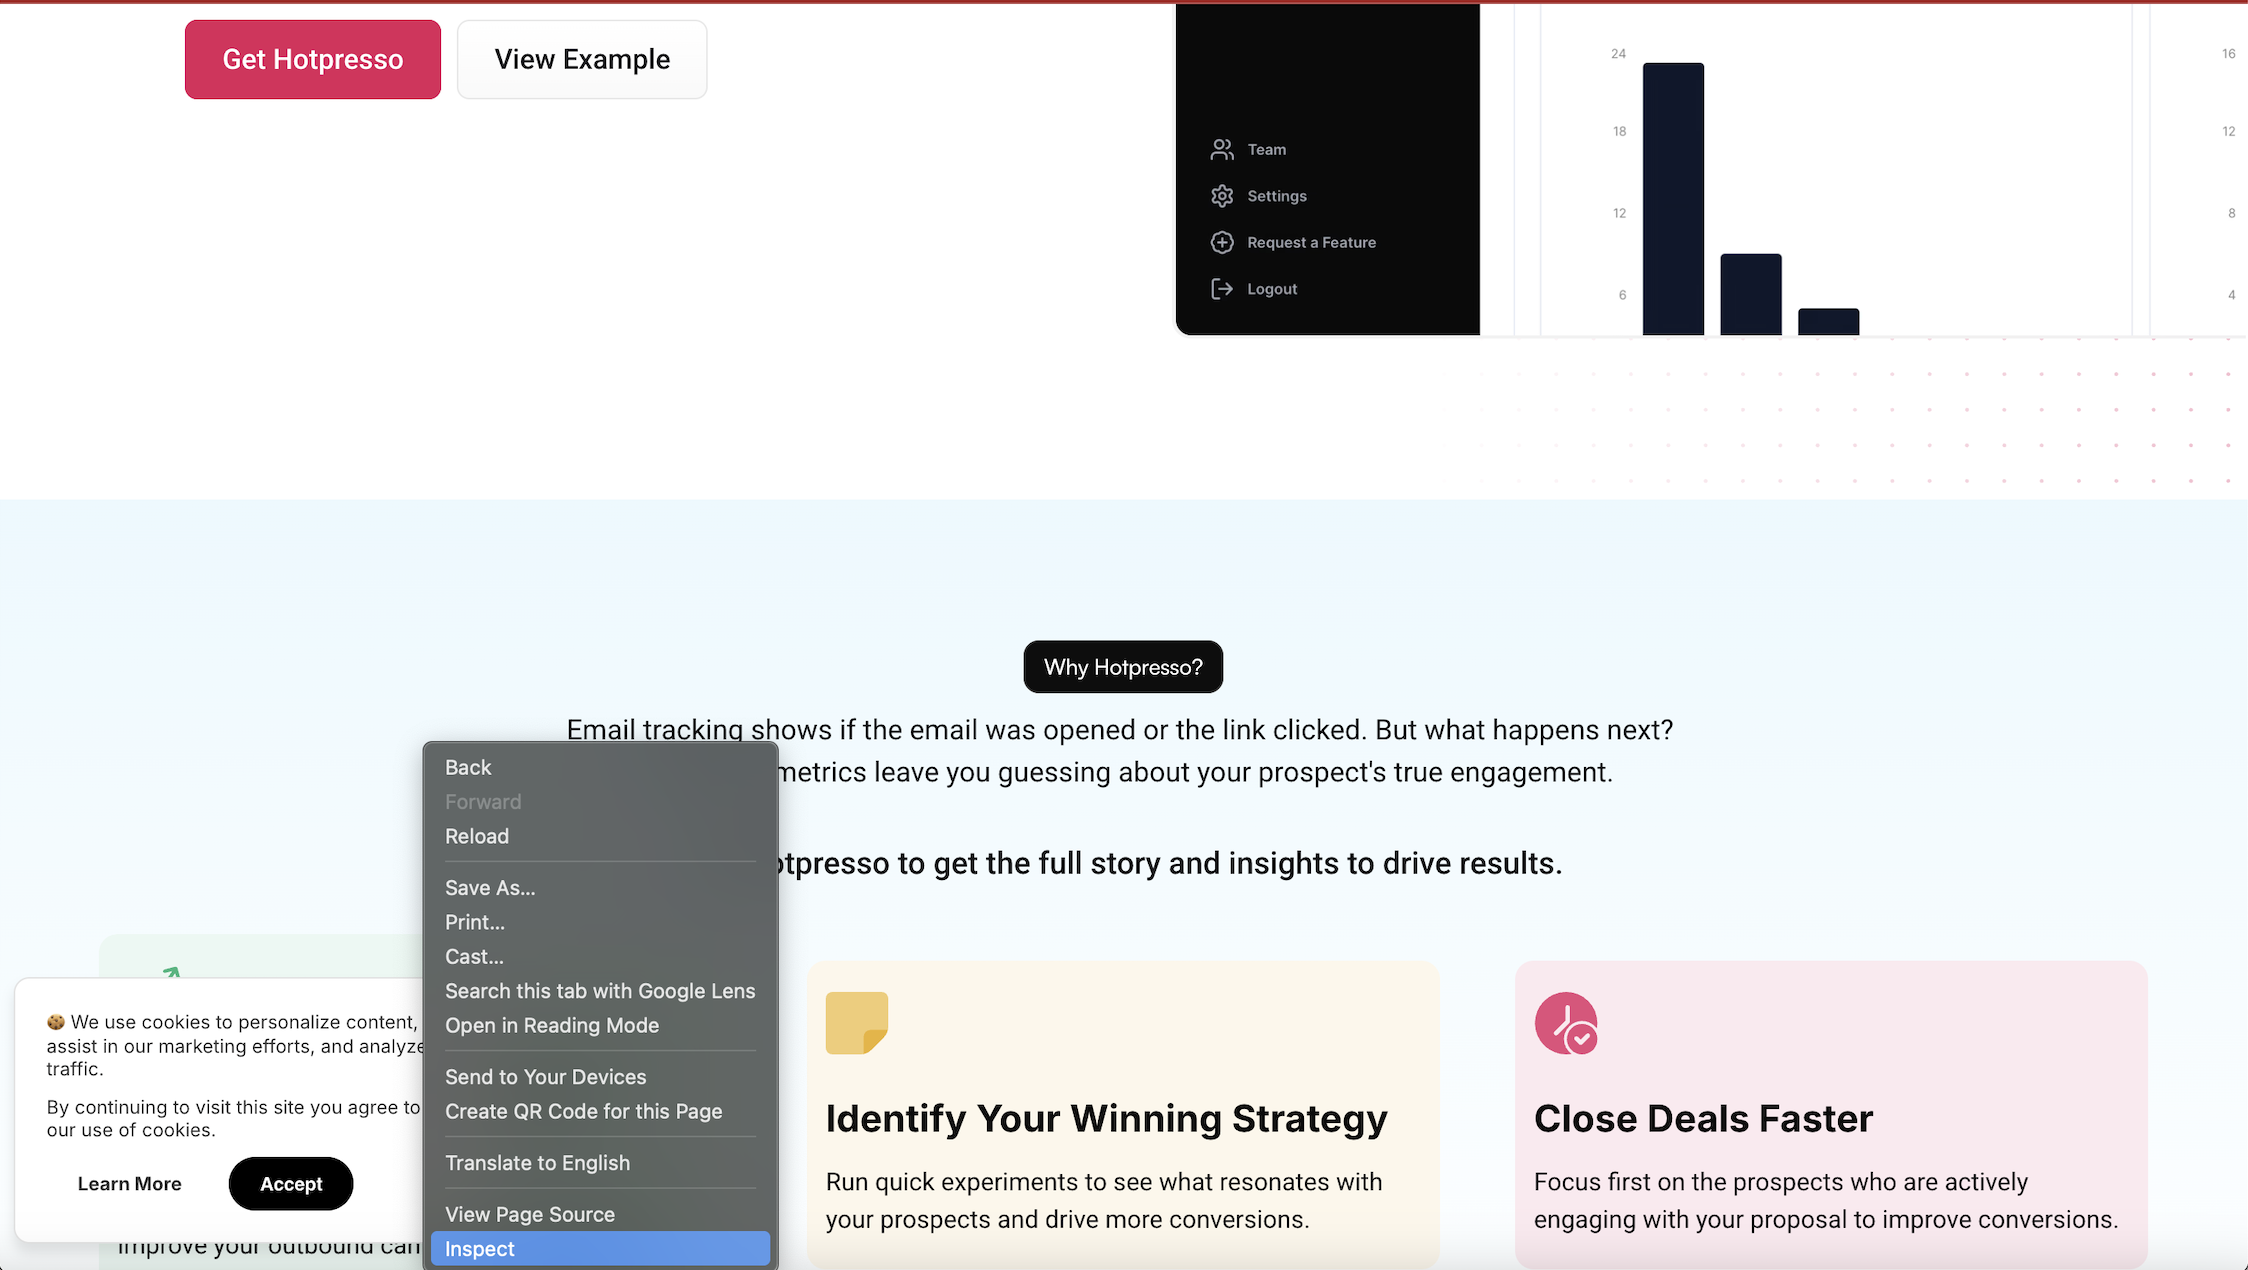
Step 2: Open developer tools on the banner
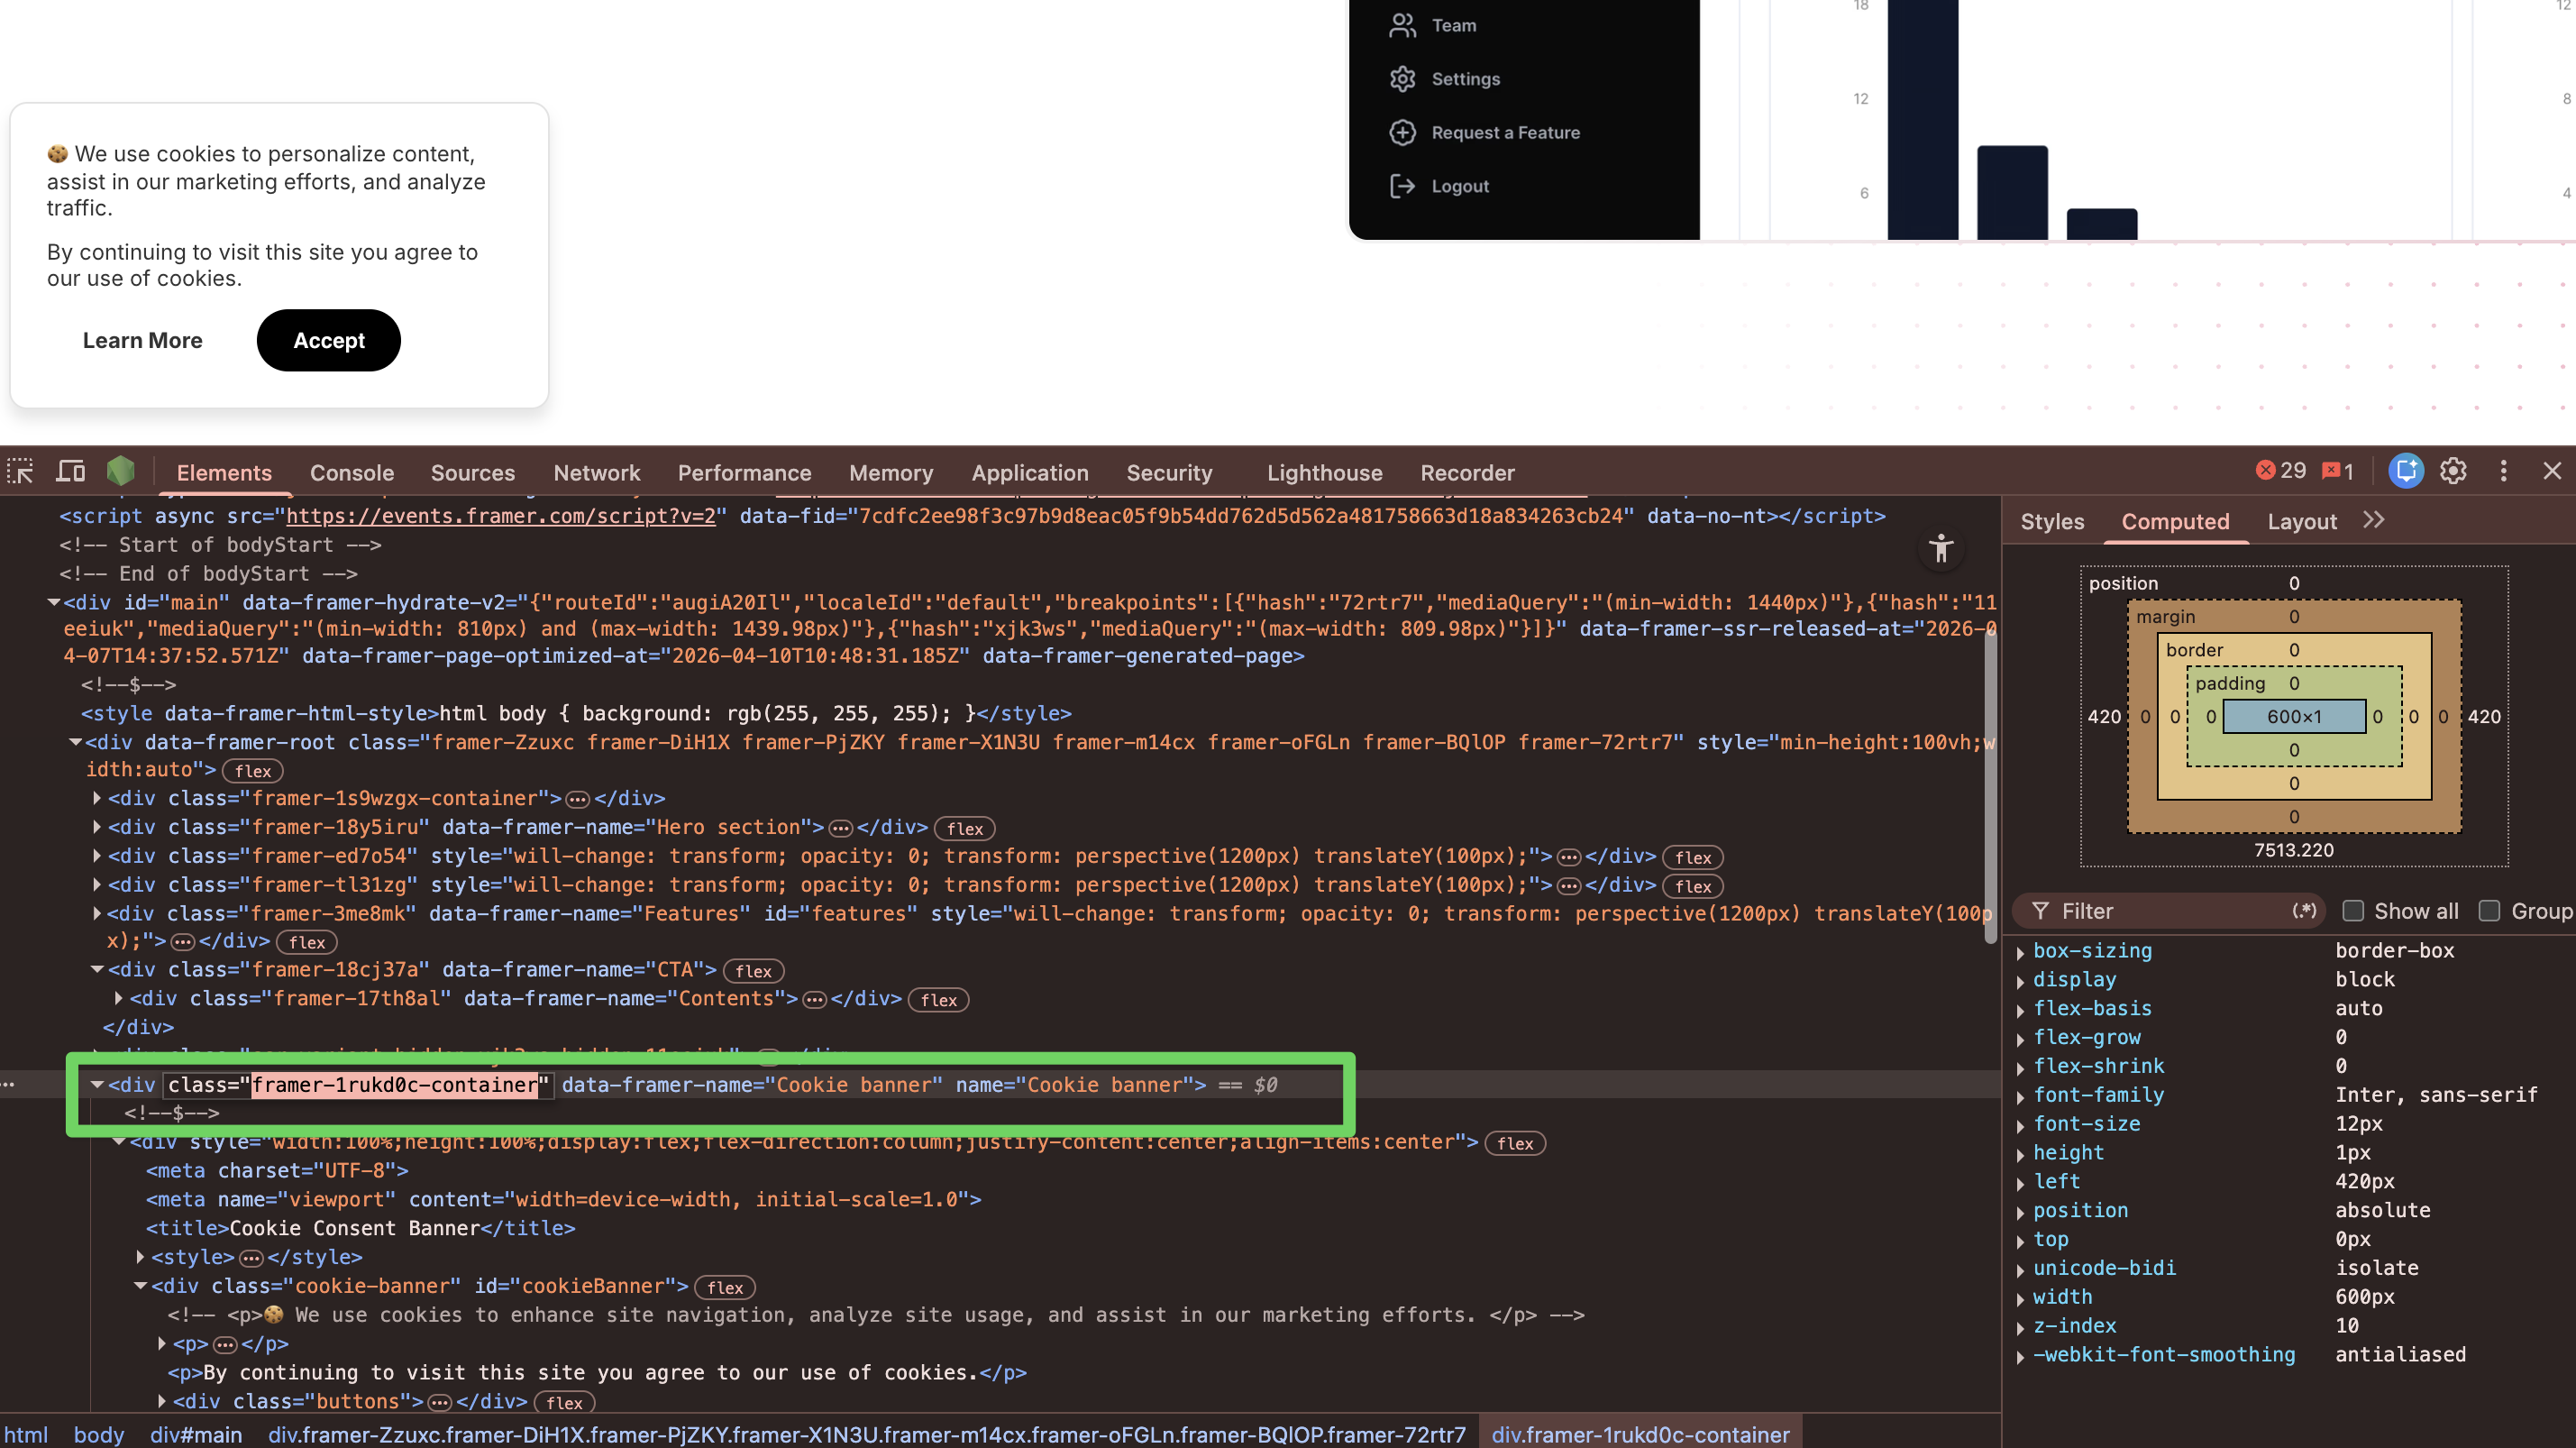
Section titled “Step 2: Open developer tools on the banner”Right-click anywhere on the cookie banner itself and choose Inspect from the menu.
The developer tools panel opens, usually on the right side or bottom of the window. You will see a panel full of HTML code. One line is highlighted in blue. That is the piece of the banner you right-clicked on.
Do not worry about understanding the code. You do not need to.
Step 3: Find the outer container
Section titled “Step 3: Find the outer container”The highlighted line is probably something small inside the banner, like a button or a piece of text. You need the outer wrapper that contains the whole banner.
Hover your mouse over each line in the HTML panel. As you hover, the browser highlights that part of the page in blue. Move up the list one line at a time and watch what gets highlighted on the page.
Keep moving up until the highlight covers the entire banner and nothing more. If the highlight suddenly covers the whole page, you went one step too far. Move back down.

Step 4: Hide the element to confirm you have the right one
Section titled “Step 4: Hide the element to confirm you have the right one”With the correct line selected in the HTML panel, right-click it and choose Hide element from the menu. The banner disappears from the page.
This is a temporary hide. It only affects your browser, not your actual site. Refreshing the page brings the banner back.
If the whole banner is gone and nothing else looks broken, you have the right element. If part of the banner is still visible, right-click the element again and choose Hide element to unhide it, then go up one more line in the HTML panel and try again.
Right-click and choose Hide element once more to unhide the banner before moving on.

Step 5: Copy the selector
Section titled “Step 5: Copy the selector”Look at the highlighted line in the HTML panel. You will see something like this:
<div id="onetrust-banner-sdk" class="otFloatingRoundedCorner">Find the id= or class= on this line. That is your selector.
- If the line has
id="something", your selector is#something. The#means ID. - If the line has
class="something", your selector is.something. The.means class.
If the element has both, prefer the ID. IDs are unique on a page, so #onetrust-banner-sdk will only ever match one element. Classes can appear multiple times, so a class like .banner might match more than just your cookie banner. The exception is IDs that look browser-generated, random strings like #div-3f9a1c, which can change between page loads. If the ID looks meaningful and stable, use it. If it looks generated, use the class instead.
If the class contains multiple names (like class="banner visible large"), start with the most specific one, like .banner. If that does not hide the banner correctly, try another class from the list.
If your site has many dynamic elements to suppress across pages, consider adding a shared class to all of them in your site code instead of maintaining multiple selectors. See Testing with Generic Classes for how this works.
Troubleshooting
Section titled “Troubleshooting”Why is my cookie banner still showing in screenshots?
Section titled “Why is my cookie banner still showing in screenshots?”If you added a selector and the banner is still in your screenshots, the selector matches only part of the banner, not the full wrapper.
Go back to your site, inspect the banner again, and try the next line up in the HTML panel. Keep going up until pressing H removes the entire banner from the page. That is the selector to use.
Why do my screenshots look grey after hiding the banner?
Section titled “Why do my screenshots look grey after hiding the banner?”Some cookie banners come with a dimmed overlay behind them that covers the whole page. Hiding the banner leaves the dim layer behind, so your screenshots look greyed out.
The fix is the same process. Inspect the dim area, find the selector for the overlay, and add it to your Dynamic selectors field alongside your banner selector. Separate them with a comma.
Example: #onetrust-banner-sdk, .onetrust-pc-dark-filter
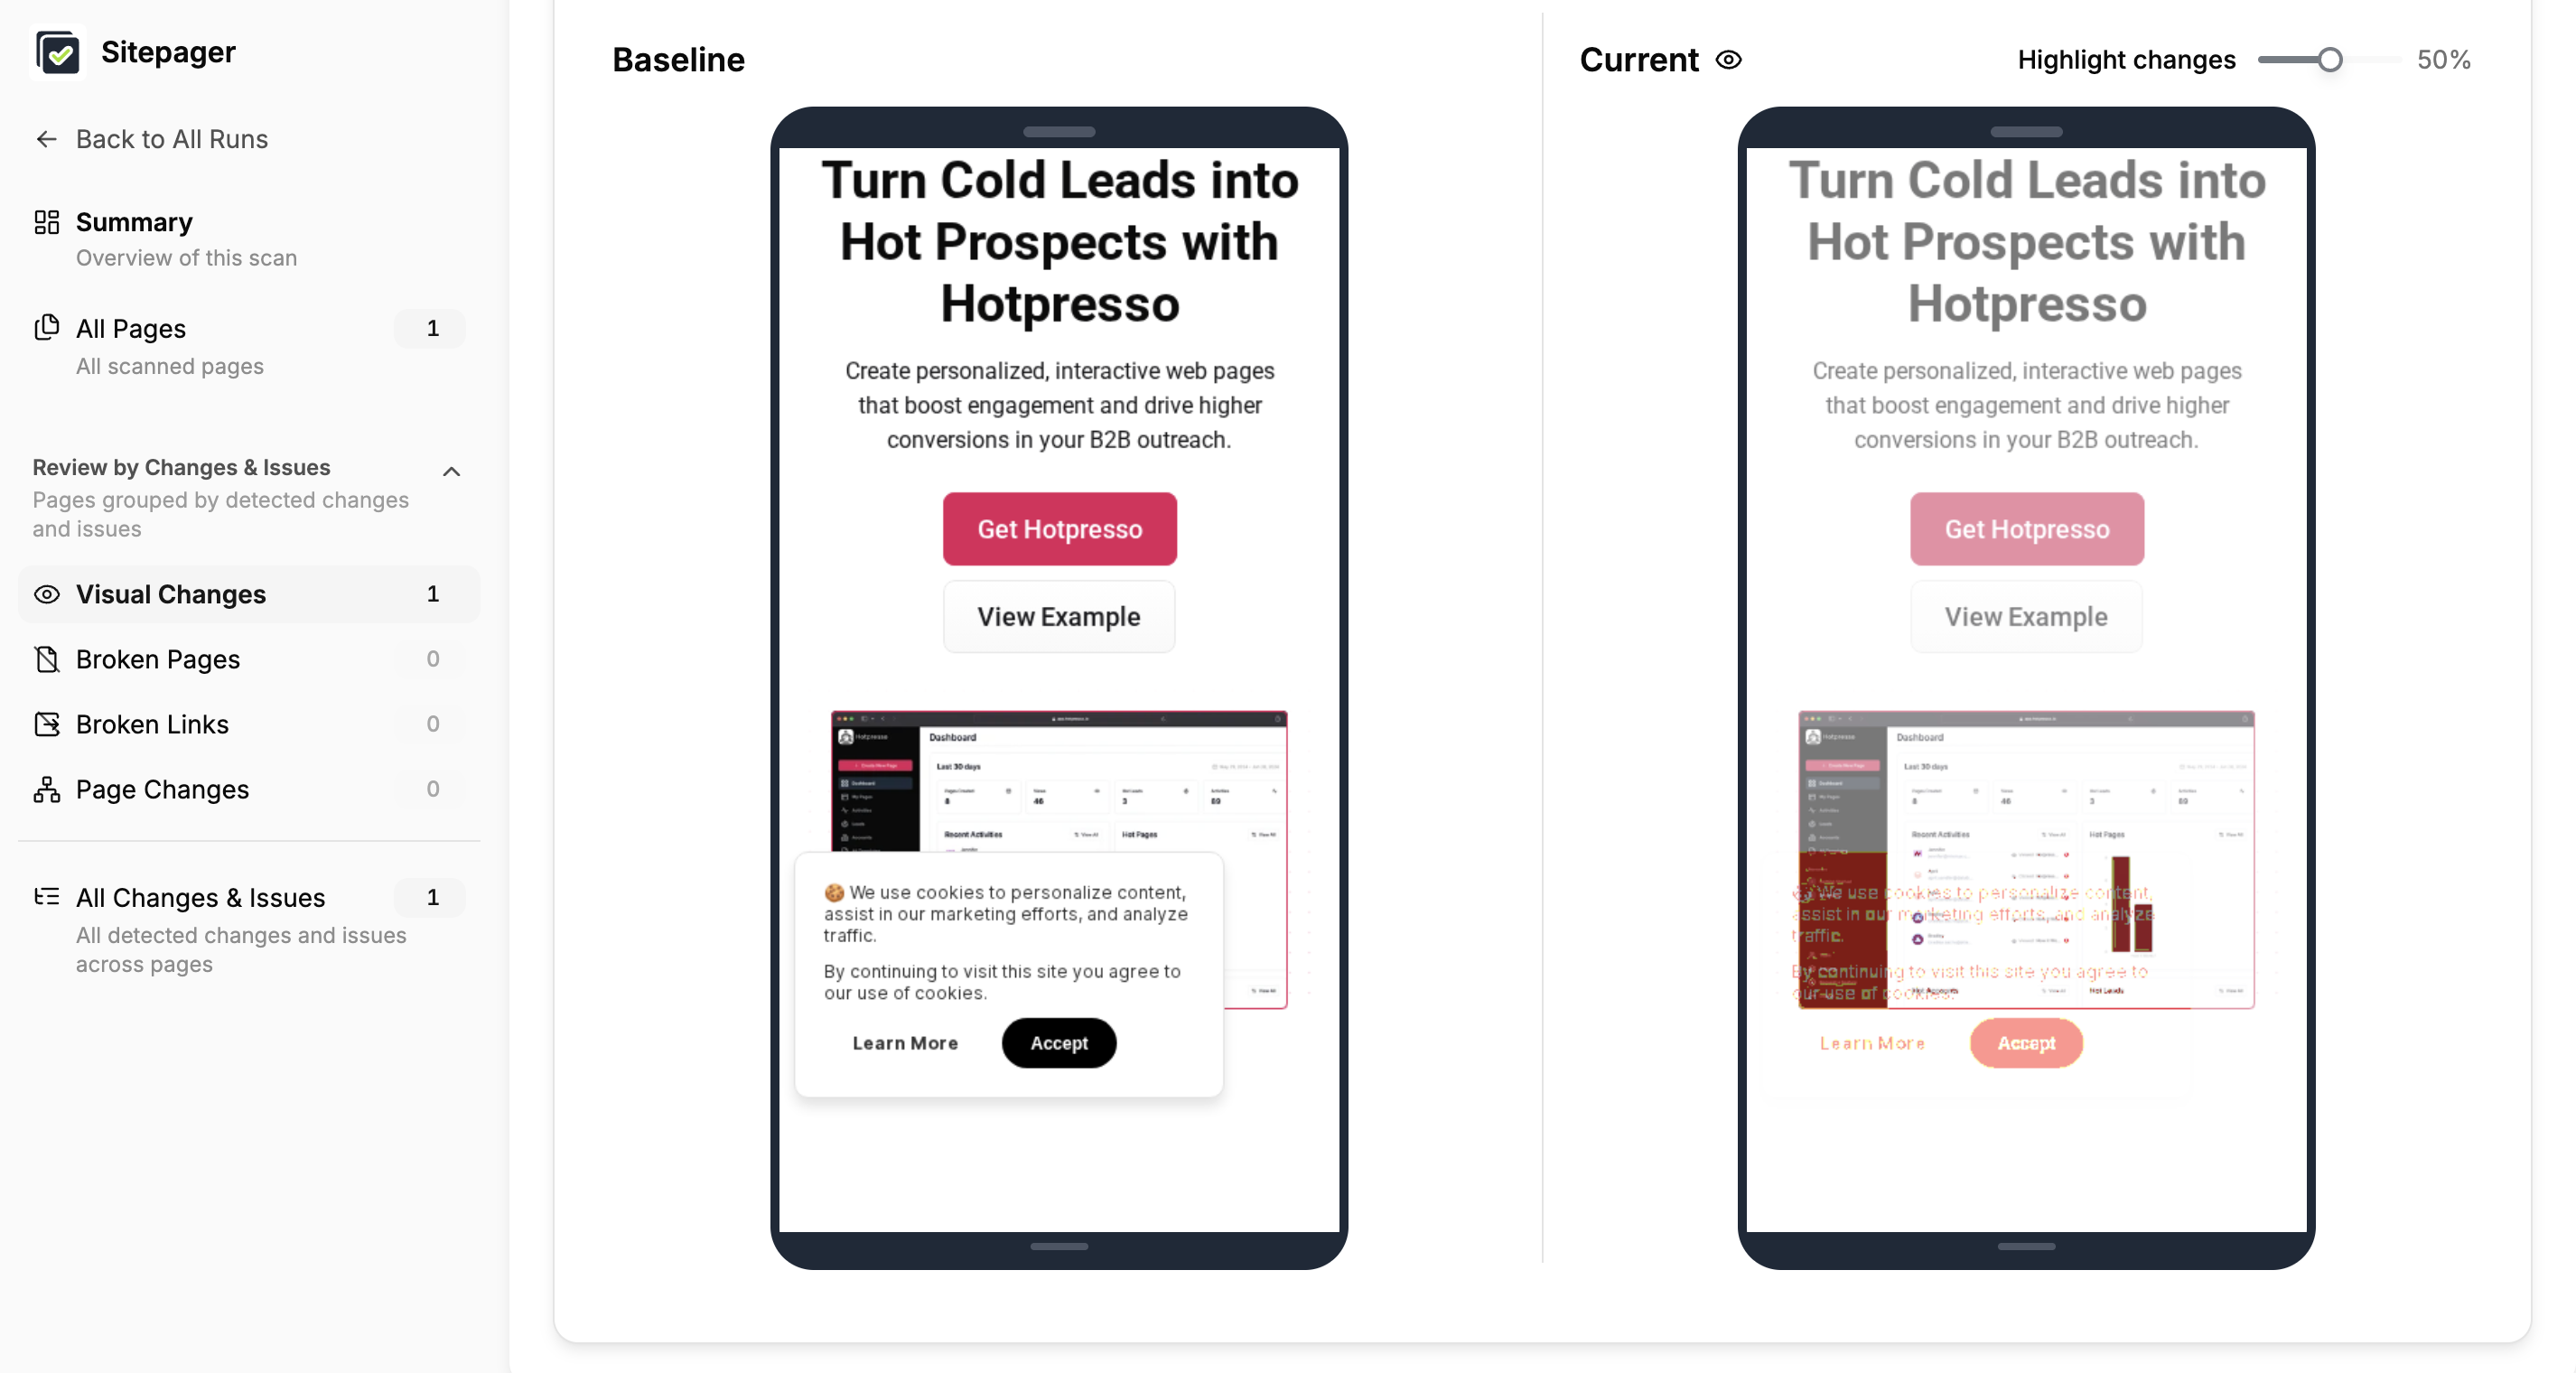
Why is every page flagging as changed after I hid the banner?
Section titled “Why is every page flagging as changed after I hid the banner?”This happens when your baseline was captured before you added the selector. The baseline screenshots include the banner. The new run screenshots do not. Sitepager compares the two pixel by pixel and flags every page as changed because the screenshots look different, even though your actual content has not changed.
The fix is to set a new baseline. After adding the cookie banner selector, run the scan, then click Set as Baseline on that run. Future runs compare against the clean layout.
What to do when your cookie banner selector stops working
Section titled “What to do when your cookie banner selector stops working”Cookie banner providers sometimes update their HTML. If your visual check suddenly starts flagging every page as changed, the provider may have pushed an update that changed the selector.
Open the site, inspect the banner, confirm the current selector, and update it in your scan settings.
To make this less fragile over time, ask whoever manages your site’s code to add a fixed custom class to the banner wrapper, like .sitepager-exclude. Use that class as your selector in Sitepager. The cookie tool’s updates will not affect your own class.
Other scenarios
Section titled “Other scenarios”How to handle cookie banners that change by region
Section titled “How to handle cookie banners that change by region”Each Sitepager scan runs from a single region. If you run multiple scans to check different regional versions of your site, each scan sees only the banner that shows in its region.
If GDPR and CCPA banners on your site use the same selector, one selector works across every scan. If they use different selectors, add all of them to each scan’s Dynamic selectors field, separated by commas. Sitepager skips selectors that do not match on a given page without error, so an unused selector has no impact.
For more on running scans from different regions, see Geolocation Testing.
How to check your cookie banner renders correctly
Section titled “How to check your cookie banner renders correctly”Hiding the banner is the right default for most scans, because the banner is noise you want out of the way. But if you want to check that the banner itself renders correctly, with the right copy, layout, and region, run a dedicated scan without the selector.
Create a second scan on the same URL without the Dynamic selectors field filled in, so every screenshot includes the banner. Re-run this scan when you update your consent tool, change wording, or add a new region. That scan becomes your appearance check.
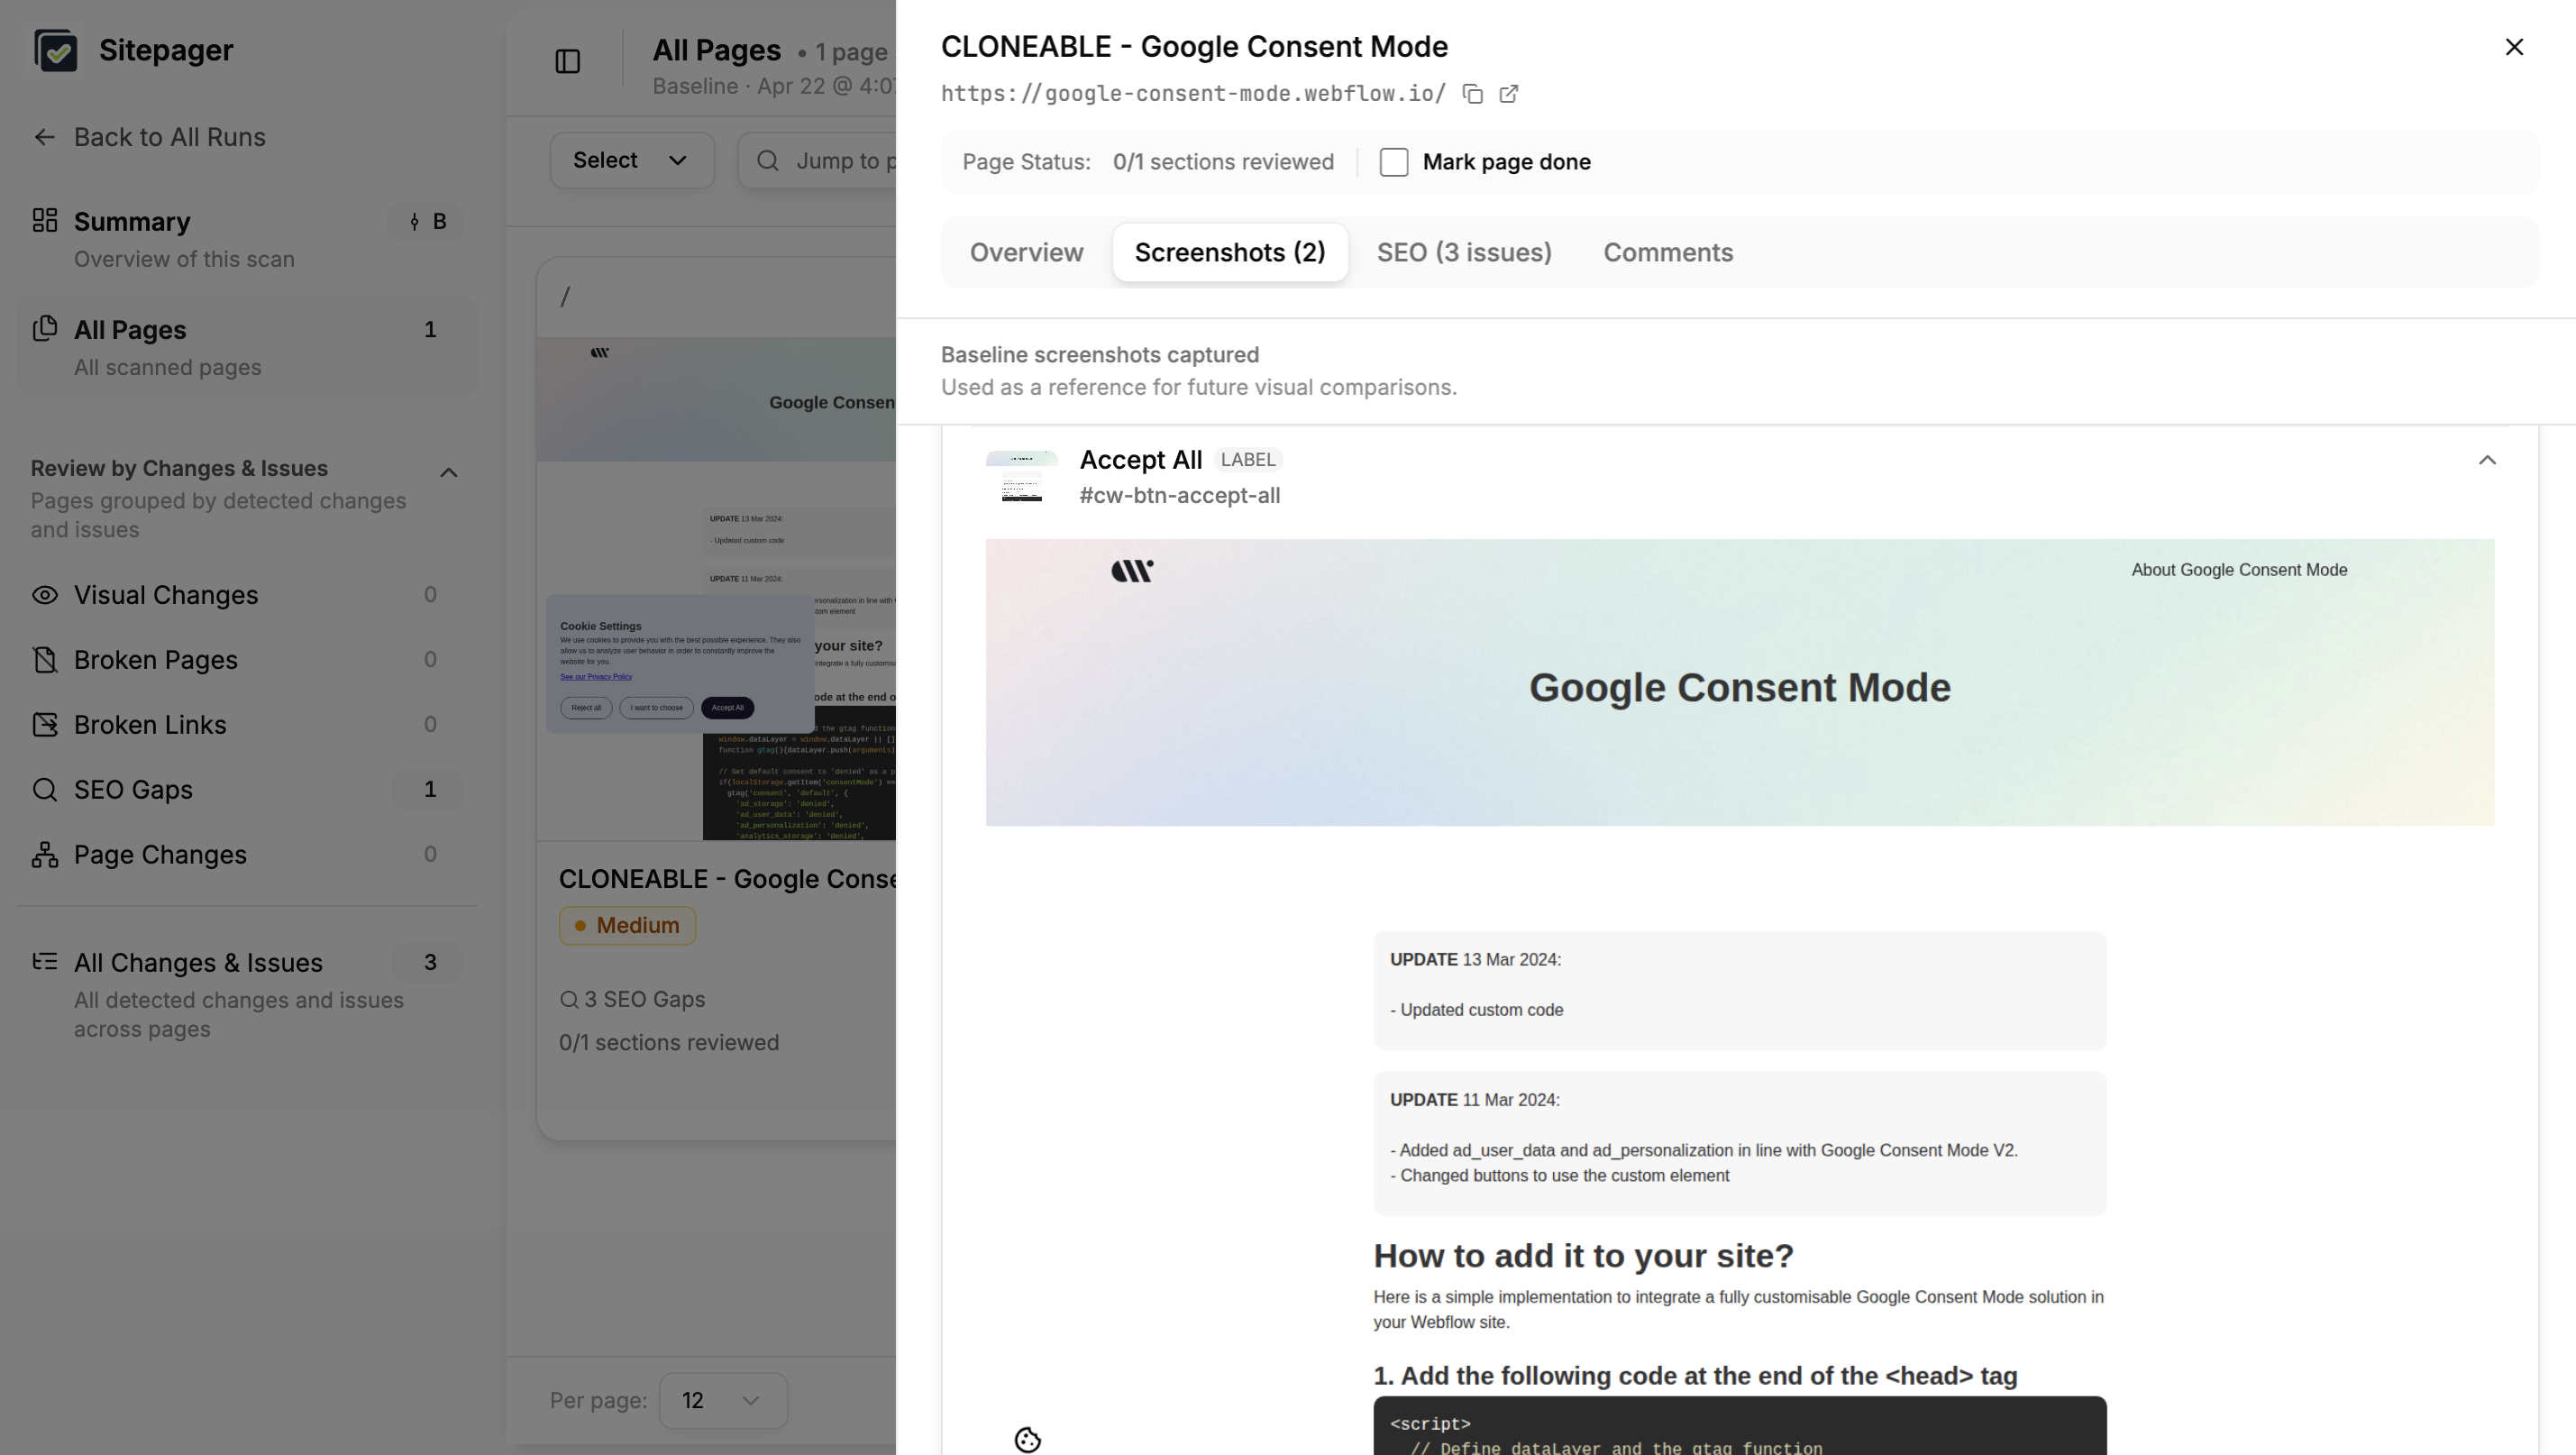
How to test that your cookie banner buttons work
Section titled “How to test that your cookie banner buttons work”Hiding the banner removes it from your screenshots but does not test whether the accept or reject buttons actually work. If you want to validate that clicking a banner button closes it correctly, use a click selector, but scope it to one or two pages, not your full site.
When you add a click selector, Sitepager takes two screenshots per page: one before the click with the banner visible, and one after the click with the banner dismissed. Across a full site scan that adds up quickly and makes results harder to review. A separate scan scoped to one or two representative pages keeps it focused.
Set up a new scan, enter your URL, set the max pages to 1 or 2, and add the banner dismiss button as a click selector under Advanced Settings > Dynamic Content & Interactions. Run that scan whenever you update your consent tool or change the banner copy.
For more on setting up click selectors, see Hover & Click Selectors.
What to do next
Section titled “What to do next”Now that the banner is hidden, re-run your scan to update the baseline. Every future run compares against the clean layout.
If your site has other dynamic elements to exclude, like rotating banners, ad slots, and live counters, see Dynamic Content Selectors. If you have many elements to exclude, Testing with Generic Classes shows how to use a single shared class instead of multiple selectors.